Dimensions
You use dimensions to describe elements uniformly in the Planner. In a dimension, for example, you can record which target group the marketing activity is aimed at. Dimensions are set up specifically for your system.
Note
You can also delete a dimension value at any time during editing. If a dimension value is already assigned to elements, the value will be deleted from all elements.
Note the special features for weighted multiple selections: If a weighted multiple selection value is deleted, all elements to which this value was assigned will have all other values of this dimension deleted as well.
You can use multiple categories of dimensions with different types.
Note
The type of a dimension can no longer be changed once the dimension has been rated for an element. You must remove all the ratings in order to delete the dimension.
With this type, the user chooses one or more predefined values. The values can be arranged as a list or in a tree structure (max. 5 levels).
|
Attribution |
Description |
|---|---|
|
Single selection |
The user chooses one value. |
|
Multiple selection |
The user chooses one or more values. |
|
Weighted Multi Selection |
The user chooses one or more values. The user also chooses the percentage weighting for the values. |
With this dimension type, the user has to enter a value whose structure matches the regular expression defined by you. This type can be used when entering a cost center, for example.
With this dimension type, the user enters free values.
|
Attribution |
Description |
|---|---|
|
Free Value |
The user edits a single-line free text field. |
|
Continuous Text |
The user edits a multi-line free text field. |
Every dimension receives an ID automatically when you create it. You need the ID when the dimension is called up via an API or synchronized with a job, for example.
You can find the ID of a dimension in two different ways:
-
You activate the display of the ID under > Planner > Settings > Dimensions in the table in a column.
-
You activate the display of the ID in the detailed view of a planning activity on the Dimensions tab in a table column. Note that not all dimensions are assigned to each planning activity.
Dimensions have the following attributes:
-
Copyable: This attribute affects the behavior of a valued dimension when an element is copied. If a dimension is copyable, its value is also copied and pasted for a new element when this element is copied. If the dimension is not copyable, it is not filled in for the element.
-
Inheritable: If a dimension is inheritable, the values entered for the element are transferred to all of the sub-elements once. Inherited values are flagged with a chain icon. You can still edit the sub-elements. Changes to parent elements no longer have an effect after this first entry.
-
Interface: Activate this attribute if the dimension is filled via an interface. In this case, the dimension is visible but cannot be edited manually.
-
Archived: If you no longer use a dimension, activate this checkbox. Archived dimensions continue to be listed in the detailed view of a planning activity but cannot be edited.
-
Required: Activate this checkbox if the dimension must be filled for each element. If a mandatory dimension is not edited, the user is informed of this on the Dimensions tab in the detailed view of a planning activity:
-
By a warning triangle in the first column.
-
With an information message below the list.
-
-
Quick filter: Activate this attribute if you want to make the dimension available to users as a quick filter. Note that the use as a quick filter is only possible for the single selection, multiple selection and free value types. Quick filters allow you to quickly compare a planning activity, for example a campaign, with elements that have been assigned the same values for a dimension.
Note
Note that an archived dimension cannot be copyable, inheritable, or selected as a required dimension at the same time.
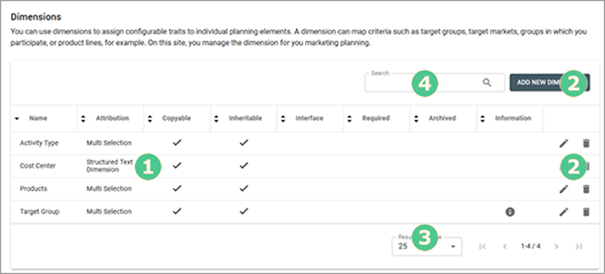
You manage dimensions under > Planner > Settings > Dimensions.
The table displays all the dimensions that have been created already (❶). Use the buttons to edit dimensions (❷).
Use the dropdown list below the table to set how many dimensions are displayed per screen (❸). Use the arrow keys to navigate through a table with multiple screens.
If you have an extensive number of dimensions, you can carry out a full-text search in the search field above the table using the dimension names (❹). The table then displays the search result.
To adapt the table to your requirements, you have the following options. The settings are saved for each user and can be adjusted again at any time.
-
Column width: Change the column width in the same way as in spreadsheet programs.
-
Sorting the displayed objects: To change the sorting, move the cursor to the header line of the table in the column to be used for the sorting. An arrow is displayed on the right-hand side of the cell. Click the arrow and choose Sort ascending and Sort descending.